Dragging Front Brake?

Recently I’ve been having some troubles with the front brakes on my PC800.  The front wheel is not spinning nearly as freely as it should.  Thanks to the help of Fred, Seth, and others on the PC800 group, it is much better now but not entirely fixed.  The left brake (with the anti-dive mechanism) works correctly and makes just a little noise but does not drag.  The right brake drags and stops the wheel sooner than I recall it stopping before.  It also makes the bike somewhat difficult to push around without power.

What precipitated finding this problem was replacing both my front and rear tires.  Eventually I’ll post some photos of why I had to replace the tires before all of the tread was used up.

Fred suggested I try riding the bike to see if the right rotor gets very hot.  That would indicate a real problem and not just something in my head.  Before I take it out for a spin (hopefully this afternoon if I can find the time), I thought that I would put up a video of the wheel spinning.  Didn’t have time this morning to take the right brake off to show the difference but with the right brake off, the wheel will spin for a minute or two once I give it a good start.

What do you, oh Pacific Coasters, think of the spin on that wheel?  Is that acceptable?  This evening, if no one thinks it is obviously unsafe to ride, I will take the bike for a spin to see how hot the rotor gets and will report back on the PC800 listserv and possibly here, too.

UPDATE: IPCRCer Fred put his bike up on a jack and gave his wheel a spin.  It does the same thing as mine.  I plan to road-test my bike as soon as I have a free hour to see if the dragging is still a big problem or not.  Perhaps slightly dragging brakes are a feature of PC800s?

LED Light Project Notes for the PC800

NOTE: If someone sees an error in the tables or anywhere else, PLEASE LET ME KNOW! 🙂

NOTE: Juan informs me that Kevin Quosig did a conversion several years ago where he replaced the incandescent bulbs with home-brewed LED arrays.  See the updates at the bottom for information on this.

NOTE: See the bottom for a few updates.

I’ve been mulling over converting my PC800 to LED lights for everything but the headlight for over a year.  The main reasons I didn’t do the conversion last year in the winter were:

  1. LED Bulbs at the time weren’t to the standards I wanted.  Many were too large to fit into the PC’s lens assemblies and also did not have particularly good lumen output.
  2. Reports of the self-canceling turn signal unit going bad as a result of an LED conversion scared me away as the self-canceling turn signal unit is rather expensive and difficult to replace.
  3. I was having difficulty determining what bulbs the PC takes without actually removing the bulbs from the bike.

Now that there is at least one positive LED conversion with good results and no fried self-canceling turn signal, I’m thinking about doing the conversion again.  Also, I anticipate needing all the extra watts I can get to run the fuel injection conversion project that I have in the works.

The bulbs for the PC800 aren’t immediately identifiable in the microfiche, owners manual, or service manual as far as I can tell.  To aid in determining what generic type of bulb goes where, I’ve put together the following table.

Bulb Description Voltage Wattage Qty Microfiche Ref # Part # Honda Code Generic Bulb Lens Color
Tail Light 12 Volts 27/7 Watts ♠ 2 H1 7 34906-MG9-771 1700301 1157 Red
Center Brake/License Plate Light 12 Volts 5 Watts 1 H1 6 34901-SB0-671 1481845 T10 Red/Clear ♣
Rear Turn Signal 12 Volts 23 Watts 2 G12 13 34905-268-671 0145318 1156 Amber
Front Turn Signal 12 Volts 23/8 Watts ♠ 2 G12 14 34906-313-671 0460485 1157 Amber
Meter Light 12 Volts 3.4 Watts 10 E4 1 34908-GA7-701
37102-567-009
37237-SA5-003
37237-SA5-004
1084672
0846436
1294925
1294966
T10 Clear ♥
Notes:
♠ Low wattage under normal running conditions, high wattage when brake pedal is depressed or turn signal is active.
♣ The brake light portion of the lens assembly is red while the part that illuminates the license plate is clear.  If replacing with an LED bulb, I would suggest getting a clear LED assembly rather than a red assembly so that the license plate light is illuminated with a neutral color.  A clever person could install white LEDs in place of the license plate lens assembly though.
♥ I suspect that, if replacing the incandescent bulbs with LED equivalents, interesting effects could be had by using colored LEDs.

The IPCRCer who has recent successful conversion to LED lights brought up an interesting point regarding the PC’s turn signal flasher unit.  They will blink faster with LED bulbs rather than incandescent bulbs.  One way to fix this is to put resistors into the circuits in order to match wattage with the old incandescent bulbs.  This is fine and dandy if you only want the benefits of having very long-lived bulbs with a nearly instantaneous response time.  However, it doesn’t help matters much if you want to save some watts for extra heated gear or whatever other sorts of electrical farkles you’ve been coveting.

In order to correct the hyperactive flashing that replacing the incandescent bulbs with LEDs will cause, replacement of the turn signal relay and position light relay is necessary.  I am told that automotive flasher units aren’t direct drop-in replacements but that with some wiring, they can be.  I haven’t quite puzzled through the existing circuit design yet but evidently, some people on some Goldwing forums have already figured it out.  When I find appropriate links, I will update this post.

The recent conversion to LED used 68 SMD LED bulbs purchased (it appears) from E-Bay seller USHD.  I will confirm that they came from this seller shortly.  Rather than worry about shoddy products from Hong Kong, this seller appears to be located in the USA.  An initial email to them was answered within a day.  Shipping is a little expensive but I’m willing to pay it if they have a quality product.  The one thing they are missing but inform me that will be available again in a couple weeks is a clear T10-style bulb.

Going off of the “Buy it Now” price on E-Bay, the cost breakdown will be as follows:

— LED Bulbs —
Bulb Description QTY Unit Price Total Cost
Tail Light † 2 $13.99 $27.98
Center Brake/License Plate Light 1 ♦ $9.99 ♠ $9.99
Rear Turn Signal ‡ 2 $13.99 $27.98
Front Turn Signal ◊ 2 $13.99 $27.98
Meter Light 10 ♦ $9.99 ♠ $49.95
Sub Total: $143.88
— Shipping —
Unit # QTY Shipped Price / Unit Shipped Total Cost
First Unit 1 $3.49 $3.49
Additional Units 11 $0.99 $10.89
Sub Total: $14.38
Grand Total: $158.26
Notes:
♠ Sold in packs of 2.  Unit price is actually for a 2-pack.  You will have one extra T10-style bulb purchasing it this way.  Also, this price is for a 8 SMD-style LED bulb.  The currently available T10-style bulbs from E-Bay seller USHD are of a different style and are less expensive.  However, they are currently not available in clear/white.  The $9.99 price comes from an email exchange I had with USHD.  I do not know if that will be the “Buy it Now” price when they become available on E-Bay in a few weeks of writing this post.
♦ Quantity given in total number of bulbs.  Sold on E-Bay through USHD in packs of 2.  You will need to buy 6 packs of T10-style bulbs total for both the center brake/license plate light and the meter lights if buying 2-packs.
† Description on USHD’s E-Bay store: 1157 Red 68 SMD LED Light Bulb Turn/Tail 2057A 2357A
‡ Description on USHD’s E-Bay store: 1156 Amber 68 SMD LED Light Bulb Turn/Tail 1141A 3497A
◊ Description on USHD’s E-Bay store: 1157 Amber 68 SMD LED Light Bulb Turn/Tail 2057A 2357A

Throw in another $50 for miscellaneous parts needed to convert the turn signal and position light relays over to electronic automotive flasher and standard relays and an LED conversion project is pushing $200 total.  But the real question for me: how many watts will be saved with this conversion?

Bulb Description QTY Incandescent Watts / Unit ‡ Total Incandescent Watts ‡ LED Watts / Unit † Total LED Watts †
Tail Light 2 27/7 Watts ♥ 54/14 Watts ♥ 5/?? Watts ♥ ◊ 10/?? Watts ♥ ◊
Center Brake/License Plate Light 1 5 Watts 5 Watts 1 Watt 1 Watt
Rear Turn Signal 2 23 Watts 46 Watts 5 Watts 10 Watts
Front Turn Signal 2 23/8 Watts ♥ 46/16 Watts ♥ 5/?? Watts ♥ ◊ 10/?? Watts ♥ ◊
Meter Light 10 3.4 Watts 34 Watts 1 Watt ♣ 10 Watts ♣
Total Watts: 185/155/69/65Watts ♦ ‡ Total Watts: 41/??/31/27 Watts ♦ ♣ ◊
Total Watt Savings: 144/??/38/38 Watts ♦ ♣ ◊ † ‡
Notes:
♥ These bulbs have “high” and “low” modes.  The larger wattage draw is during the “high” condition.  This happens when a turn signal or the brakes are activated.
♦ The first number represents the maximum potential load on the system if all lights are on.  To achieve this, the brakes, both turn signals, and all of the indicator lights would have to be on.  This could be seen if you have a hazard light modification installed to allow both blinkers to blink simultaneously.  The second number is the normally seen maximum wattage when the brakes and one turn signal are activated along with all of the indicator lights.  This could happen if you were pulled over at the side of the road with the engine off, kick stand down, transmission in neutral, and high beams on.  The third number is the normal operating condition of the bike.  This would be with the engine running, kickstand up, no turn signals activated, no brake activation, and low headlight beam.  The fourth number represents the minimum wattage the bike sees and what the average PCer would have on a normal ride.
♣ The wattage for the new T10-style LED bulbs that E-Bay seller USHD will shortly offer on E-Bay is not yet know.  I am guessing, based upon the currently-offered T10-style LED bulbs, that the new bulbs will use 1 Watt or less.
◊ The “low” condition isn’t known for the LED bulbs because USHD’s website does not list them.
† This assumes that what is reported on E-Bay seller USHD’s auctions for wattage characteristics of the LED bulbs is accurate.
‡ This assumes that the wattage information provided in the PC800 Microfiche is accurate.

The take-away from all of this is that (theoretically) 38 watts at normal operation conditions can be saved.  That’s a pretty significant savings.  For comparison, a pair of Gerbing T-5 gloves uses 27 watts at maximum load.  Considering my fuel injection project will most likely consume many more watts than the 38 watts that a full LED conversion could potentially save, it seems like a smart move for me if I start getting pinched for watts.  However, I think with the high cost of the full conversion, I might wait until I determine that I really need to switch to LED to squeeze a few more available watts out of the PC800’s electrical system.

UPDATES:

At least one IPCRCer reports converting his entire bike over to LED for $75 and did not need to replace his flasher.  I am waiting for more information on what bulbs he used and where he bought them.

Seth suggests checking out http://www.superbrightleds.com/ and http://www.ledtronics.com/ for good additional information and high-quality LED bulbs.  He says that you get what you pay for.  I looked into these two companies a year ago when I considered converting before.  At the time I wasn’t impressed with their product listings.  It looks like they have some new stuff that is a bit better.  Their prices are higher than what I listed in the tables above.  Seth also suggests going with color-matched bulbs.

The point was brought up by Seth that any extra watts have to go somewhere due to the PC alternator’s configuration.  They get dumped into the R/R which could be looked at as a consumable item.  This gives me the idea of hooking up some extra resistors on the bike to dissipate extra power when I don’t have a full loading case.  Throwing on some simple circuitry to monitor voltage to enable or disable power resistors would make it all automated.  Or a high-power MOSFET might work…

The Kevin Quosig LED conversion project appears to have been quite the feat.  He started with converting his Uni-Go trailer to using LED arrays sourced from Custom Dynamics.  The steps to his Uni-Go conversion are here: Step 1, Step 2, Step 3, Step 3.5, end results of the Uni-Go conversion.  The steps to his PC conversion are here: Step 1, Step 2, Step 3, Step 4, Step 5, end results of the PC800 conversion.  The total cost of the entire conversion was approximately $1000.  Yes one thousand dollars.  Kevin thinks it was worth it though.  I would suspect with the reduction in price of high quality, high output LEDs since 2004, this project could be done much more inexpensively today.  Especially if you were to build your own array boards.

Rebuilding the Fuel Petcock on a Honda Pacific Coast

UPDATE: Per Fred’s comments on the IPCRC, I removed the bit in here about covering over the second vacuum port on the petcock.  However, when I did that, my bike became very starved for fuel (wouldn’t idle above 1000 rpm).  I need to reopen the petcock and see if something is wrong inside of it.

UPDATE #2: For peace-of-mind, I removed my petcock and replaced it with a brass T. There is some debate over if this is safe to do or not. So far I haven’t had any problems. The bike does seem to go through 3000 RPM slightly differently and sound just a little different. I suspect I need to rebalance the carbs as I capped off the left side vacuum port when I removed the petcock. I still have the petcock in the trunk of my PC to serve as a warning to other parts that might give me trouble. One of these days I’ll open it up and see if the diaphragm didn’t get seated correctly. Anyway, depending on what you want to do, look below for instructions on how to rebuild your petcock!

Back in the spring I started having troubles with my PC suddenly losing power as I was riding up steep grades at freeway speeds.  It seemed to only do it when I was going faster than 65mph, on a 6% or greater grade, and had at least a half mile of uphill.  I could close the throttle, reopen it, and get some more power, but eventually I would put put put along until I would be stopped at the side of the road.  It felt like a fuel starvation issue where I was using more fuel than could be gotten to the carbs.  This led me on a quest to find the source which hopefully just ended last night.

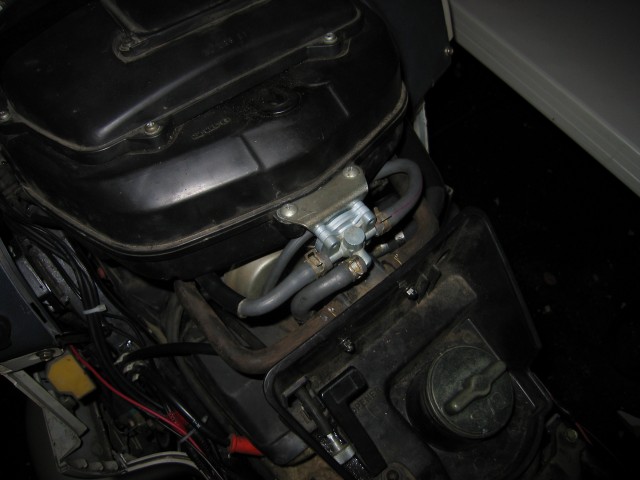
I decided after much thought and many questions on the IPCRC that the most likely place for trouble was the fuel petcock.  Perhaps, I thought, the rubber diaphragm has developed a hole or leak.  Or maybe it’s just old and needs to be replaced.  Having the petcock not open all the way would be a good explanation for the troubles I’ve been having.  A few weeks ago I ordered up the fuel petcock rebuild kit as recommended by several on the IPCRC.  I got it from ServiceHonda about ten days after I ordered it.  The Honda part number is 16953-ME5 025.  I should note that this petcock rebuild kit is actually meant for another bike but that it works on our bike except for the spring included in the kit.  Don’t use that spring.  Use the spring that is currently in your petcock instead.  Otherwise, all of the parts are identical.

I should also note that if you don’t want to rebuild your petcock, many people have successfully replaced theirs with a brass T.  One can be found at any auto parts store.  Just be sure to plug the vacuum line since it won’t be needed anymore.
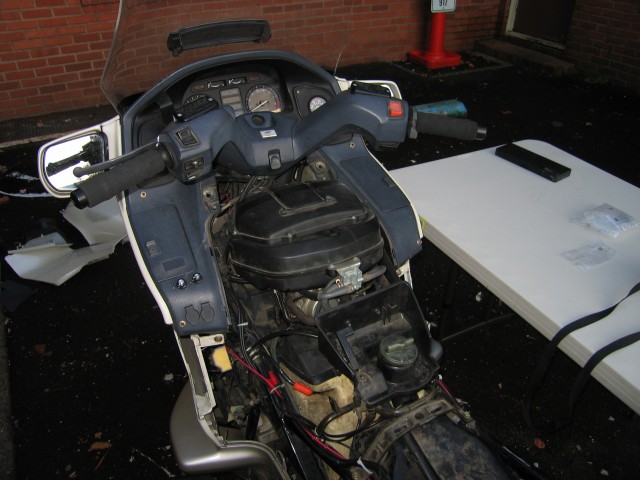
Here is my bike with the plastics removed to get at the petcock.  It is mounted on the back side of the air cleaner box and just forward of the gas cap and trunk release lever.
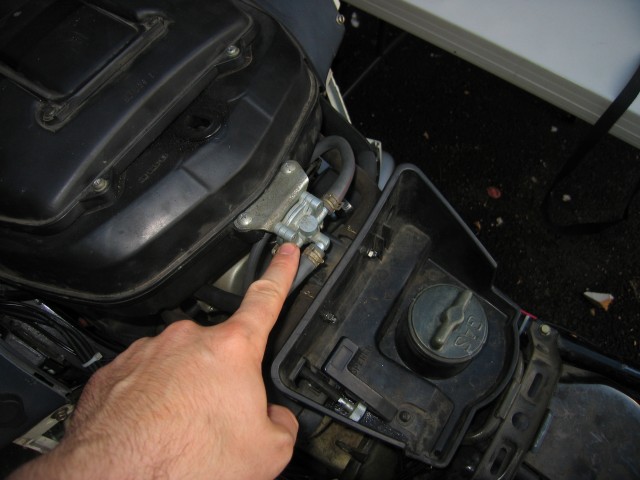
That silver dodad with all of the hoses that I’m pointing at is the petcock.  Make sure you get a proper screwdriver to take all of the screws out.  A Phillips driver is actually the wrong thing.  Pick up a set of Japanese screw drivers that look like they are all Phillips heads but in fact have slightly different dimensions.  In a pinch though, you can be careful about it and use a Phillips head.  I did that and nearly stripped a few screws.

To take off the hoses, I used a pair of needle nose pliers to remove the hose clamps.  I then used the tip of the needle nose piers to gently push off the hoses enough that I could remove them by hand the rest of the way.  The hoses were a bit stuck on.  There are a total of four hoses to remove.  Three are fuel lines and one is a vacuum line.
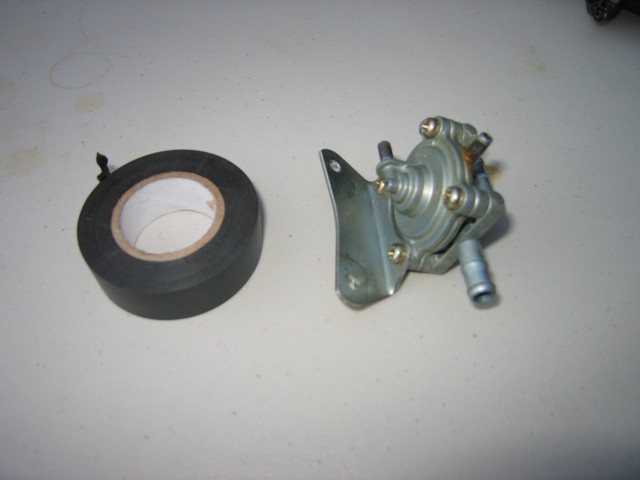
This is the petcock off the bike.  I put a roll of electrical tape next to it for size comparison.  The thing is not that big but does an important job.
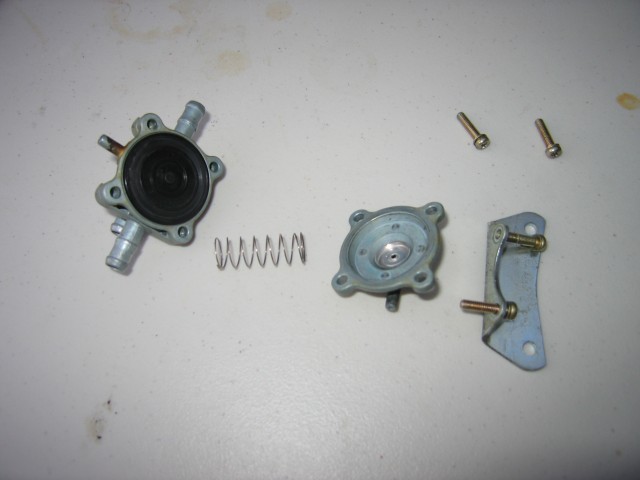
The petcock partially disassembled.  The side on the right carries the vacuum from the engine to the petcock diaphragm.  The spring makes sure the diaphragm returns to the sealed position when the engine is off.
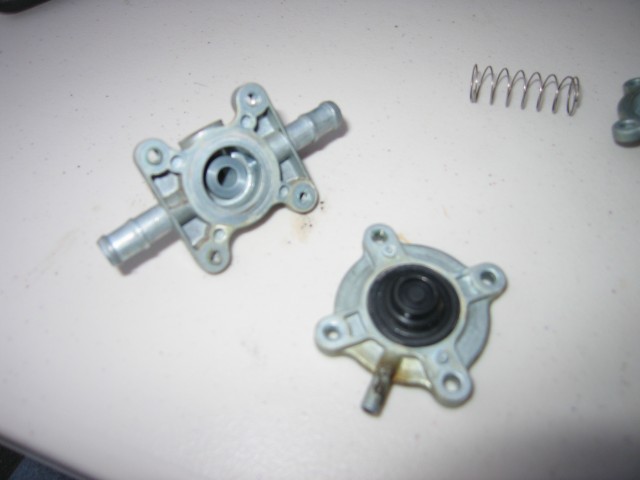
Here is the other side of the petcock with the diaphragm middle bit separated from where the fuel lines come in and run out to the carbs.
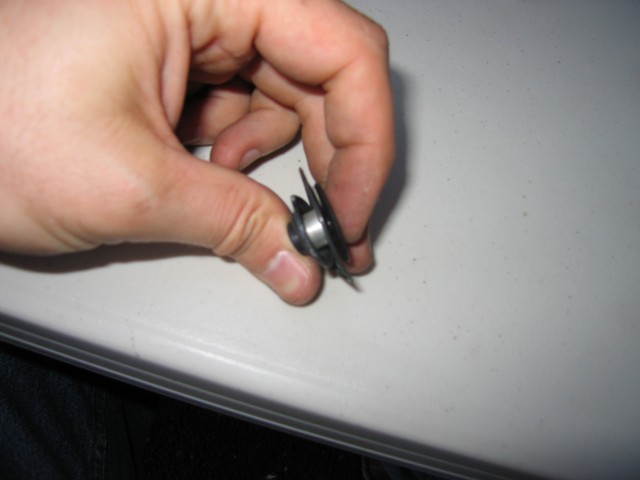
This is what the diaphragm looks like removed.  You don’t need to do this but I was curious so I took it apart to see what it looks like.  There is a metal spacer with two different rubber diaphragms and a plastic-ish disk.
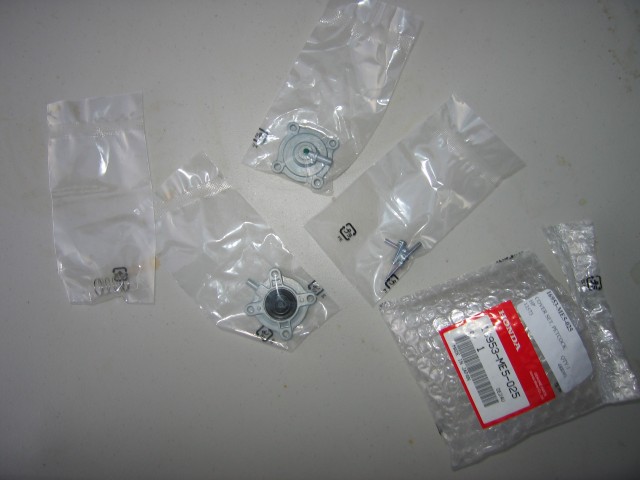
These are the parts that come with the Honda #16953-ME5 025 kit.  There are new screws, a new spring (that we won’t use), a new vacuum side of the petcock, and a new diaphragm assembly.
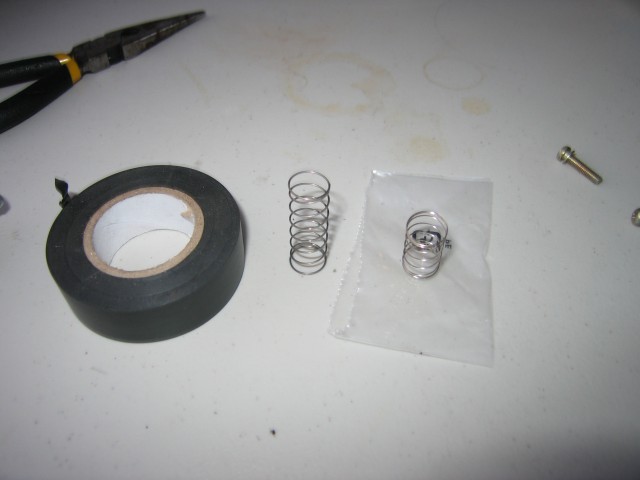
The old spring is on the left.  The new spring is on the right.  Yes, they are quite different in terms of length.  Otherwise they are the same diameter and seem to be made from the same spring wire.
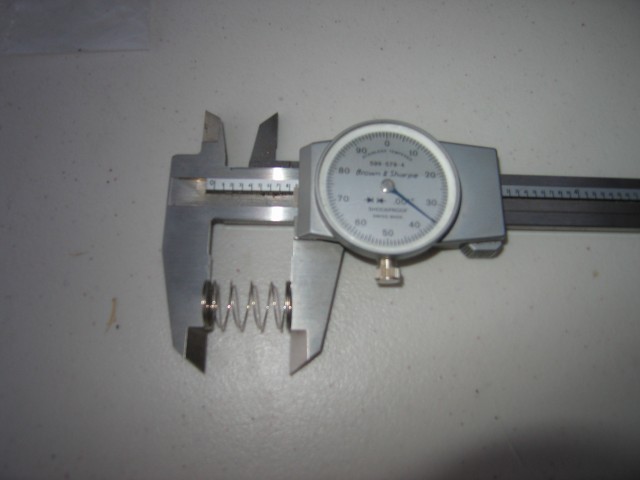
This is the new spring.
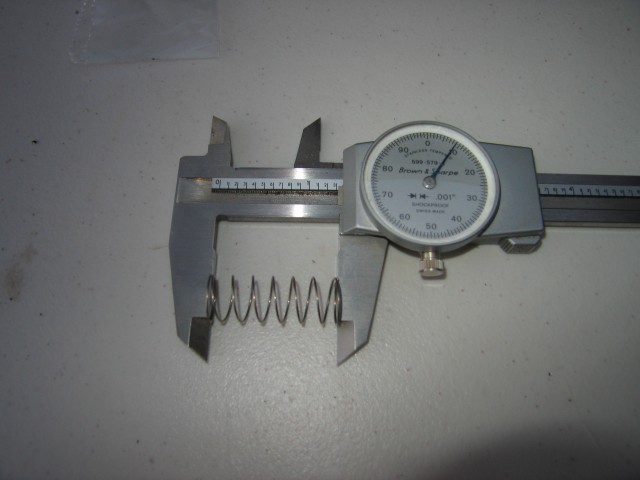
This is the old spring.  The old spring is quite a bit longer than the new spring.  Use the old one and chuck the new one into your spare parts bin.
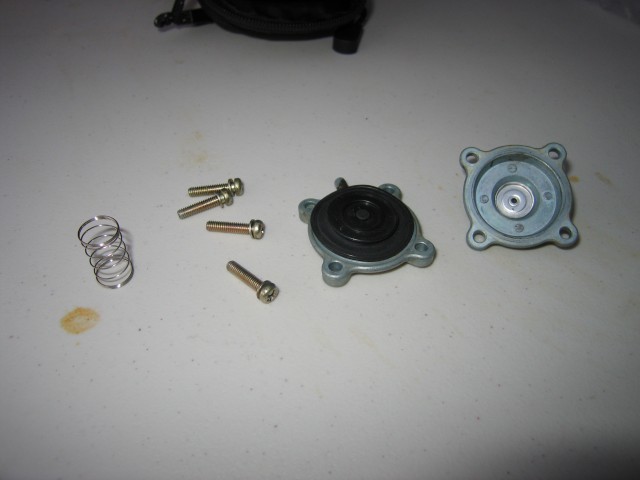
When you have reassembled your petcock, you will be left with these parts.  The new (unused) spring, the four old screws, the old diaphragm assembly, and the old vacuum side of the petcock.

Interestingly, I noticed that the old vacuum side of the petcock seems to have some sort of a defect where that silver disk that I’m pointing at didn’t seat quite correctly when it was made.  No clue if this is a problem or not.

Here is the freshly rebuilt petcock reinstalled in my PC800.  An hour-long ride indicated that it is at least functioning properly without any gas leaks.  I haven’t been able to test the bike to see if I fixed the fuel starvation issue yet though.  The closest place I can do that is two hours away.  When I finally have the chance to test, I will be sure to update this page.