UPDATE: Per Fred’s comments on the IPCRC, I removed the bit in here about covering over the second vacuum port on the petcock. However, when I did that, my bike became very starved for fuel (wouldn’t idle above 1000 rpm). I need to reopen the petcock and see if something is wrong inside of it.
UPDATE #2: For peace-of-mind, I removed my petcock and replaced it with a brass T. There is some debate over if this is safe to do or not. So far I haven’t had any problems. The bike does seem to go through 3000 RPM slightly differently and sound just a little different. I suspect I need to rebalance the carbs as I capped off the left side vacuum port when I removed the petcock. I still have the petcock in the trunk of my PC to serve as a warning to other parts that might give me trouble. One of these days I’ll open it up and see if the diaphragm didn’t get seated correctly. Anyway, depending on what you want to do, look below for instructions on how to rebuild your petcock!
Back in the spring I started having troubles with my PC suddenly losing power as I was riding up steep grades at freeway speeds. It seemed to only do it when I was going faster than 65mph, on a 6% or greater grade, and had at least a half mile of uphill. I could close the throttle, reopen it, and get some more power, but eventually I would put put put along until I would be stopped at the side of the road. It felt like a fuel starvation issue where I was using more fuel than could be gotten to the carbs. This led me on a quest to find the source which hopefully just ended last night.
I decided after much thought and many questions on the IPCRC that the most likely place for trouble was the fuel petcock. Perhaps, I thought, the rubber diaphragm has developed a hole or leak. Or maybe it’s just old and needs to be replaced. Having the petcock not open all the way would be a good explanation for the troubles I’ve been having. A few weeks ago I ordered up the fuel petcock rebuild kit as recommended by several on the IPCRC. I got it from ServiceHonda about ten days after I ordered it. The Honda part number is 16953-ME5 025. I should note that this petcock rebuild kit is actually meant for another bike but that it works on our bike except for the spring included in the kit. Don’t use that spring. Use the spring that is currently in your petcock instead. Otherwise, all of the parts are identical.
I should also note that if you don’t want to rebuild your petcock, many people have successfully replaced theirs with a brass T. One can be found at any auto parts store. Just be sure to plug the vacuum line since it won’t be needed anymore.
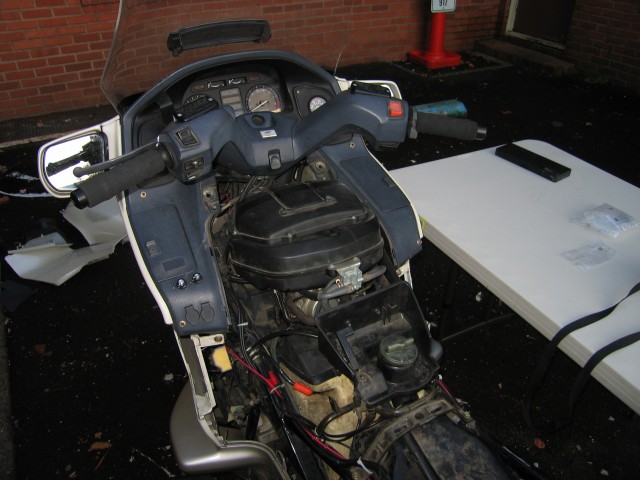
Here is my bike with the plastics removed to get at the petcock. It is mounted on the back side of the air cleaner box and just forward of the gas cap and trunk release lever.
That silver dodad with all of the hoses that I’m pointing at is the petcock. Make sure you get a proper screwdriver to take all of the screws out. A Phillips driver is actually the wrong thing. Pick up a set of Japanese screw drivers that look like they are all Phillips heads but in fact have slightly different dimensions. In a pinch though, you can be careful about it and use a Phillips head. I did that and nearly stripped a few screws.
To take off the hoses, I used a pair of needle nose pliers to remove the hose clamps. I then used the tip of the needle nose piers to gently push off the hoses enough that I could remove them by hand the rest of the way. The hoses were a bit stuck on. There are a total of four hoses to remove. Three are fuel lines and one is a vacuum line.
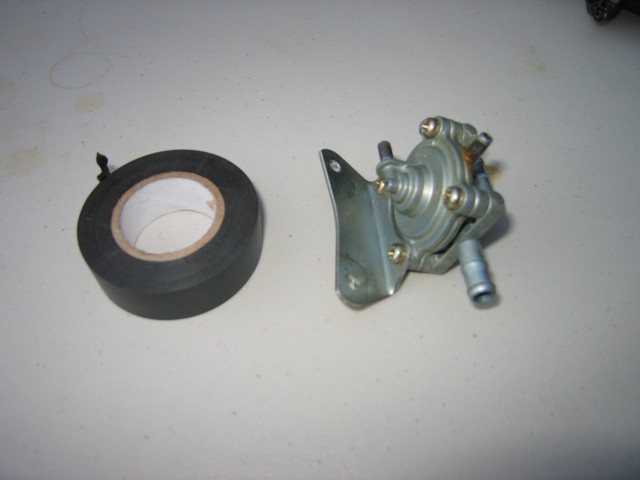
This is the petcock off the bike. I put a roll of electrical tape next to it for size comparison. The thing is not that big but does an important job.
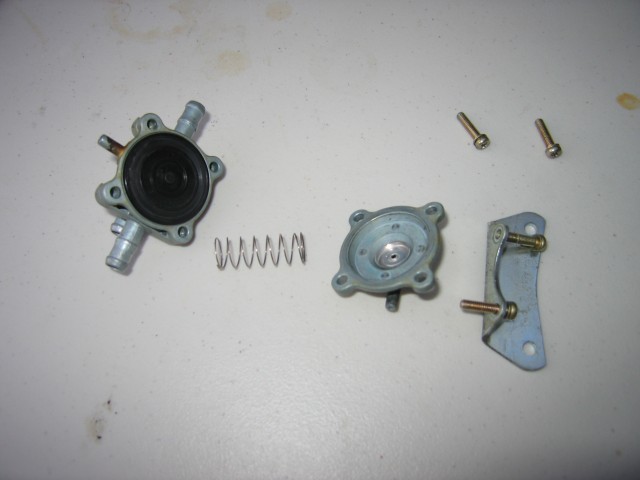
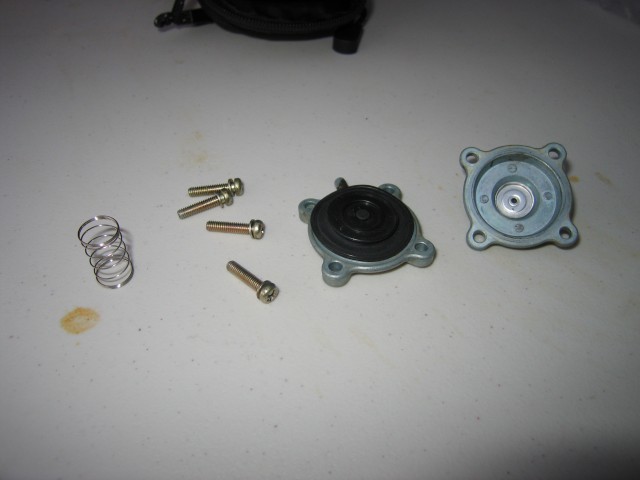
The petcock partially disassembled. The side on the right carries the vacuum from the engine to the petcock diaphragm. The spring makes sure the diaphragm returns to the sealed position when the engine is off.
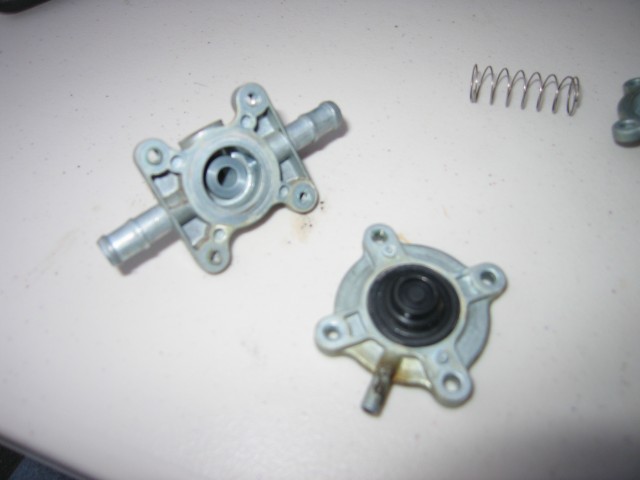
Here is the other side of the petcock with the diaphragm middle bit separated from where the fuel lines come in and run out to the carbs.
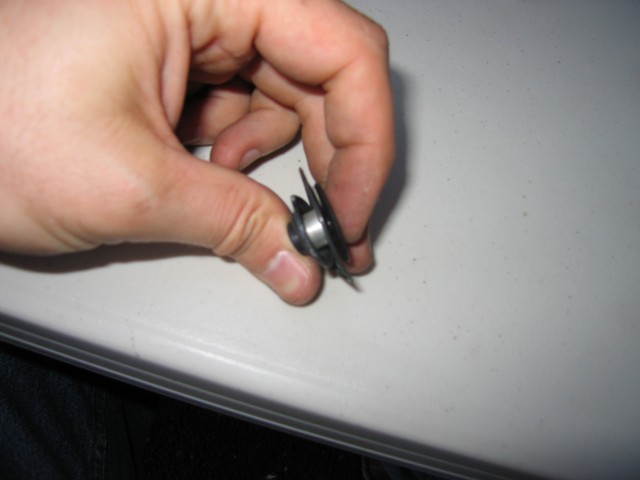
This is what the diaphragm looks like removed. You don’t need to do this but I was curious so I took it apart to see what it looks like. There is a metal spacer with two different rubber diaphragms and a plastic-ish disk.
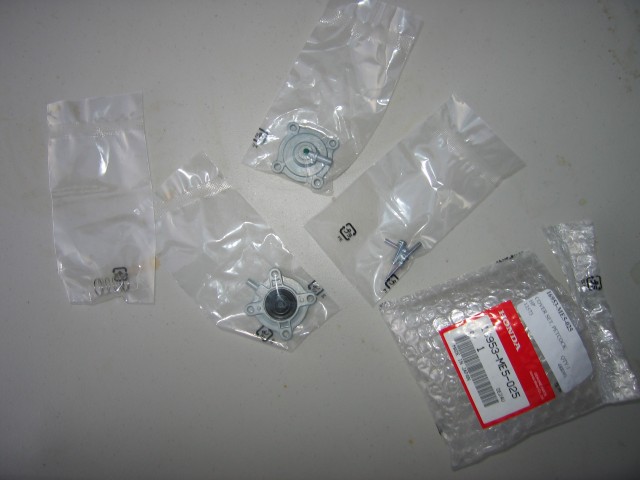
These are the parts that come with the Honda #16953-ME5 025 kit. There are new screws, a new spring (that we won’t use), a new vacuum side of the petcock, and a new diaphragm assembly.
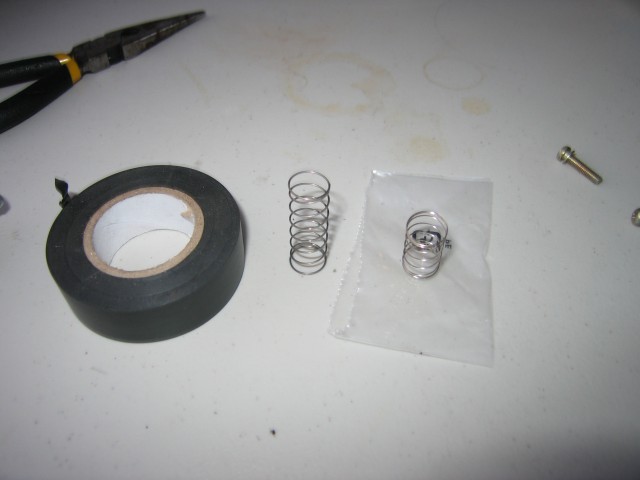
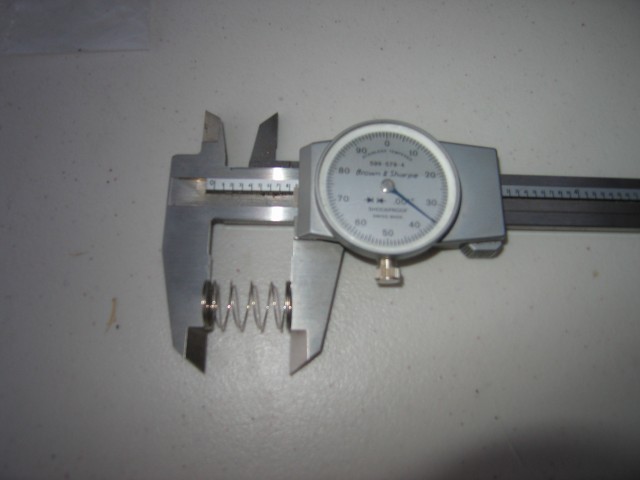
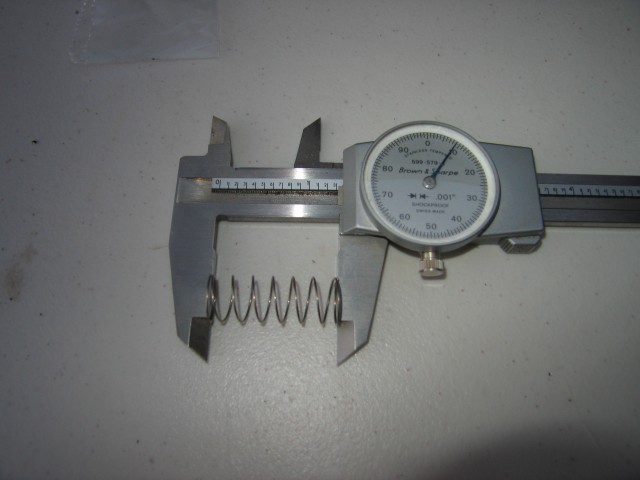
The old spring is on the left. The new spring is on the right. Yes, they are quite different in terms of length. Otherwise they are the same diameter and seem to be made from the same spring wire.
This is the new spring.
This is the old spring. The old spring is quite a bit longer than the new spring. Use the old one and chuck the new one into your spare parts bin.
When you have reassembled your petcock, you will be left with these parts. The new (unused) spring, the four old screws, the old diaphragm assembly, and the old vacuum side of the petcock.
Interestingly, I noticed that the old vacuum side of the petcock seems to have some sort of a defect where that silver disk that I’m pointing at didn’t seat quite correctly when it was made. No clue if this is a problem or not.
Here is the freshly rebuilt petcock reinstalled in my PC800. An hour-long ride indicated that it is at least functioning properly without any gas leaks. I haven’t been able to test the bike to see if I fixed the fuel starvation issue yet though. The closest place I can do that is two hours away. When I finally have the chance to test, I will be sure to update this page.

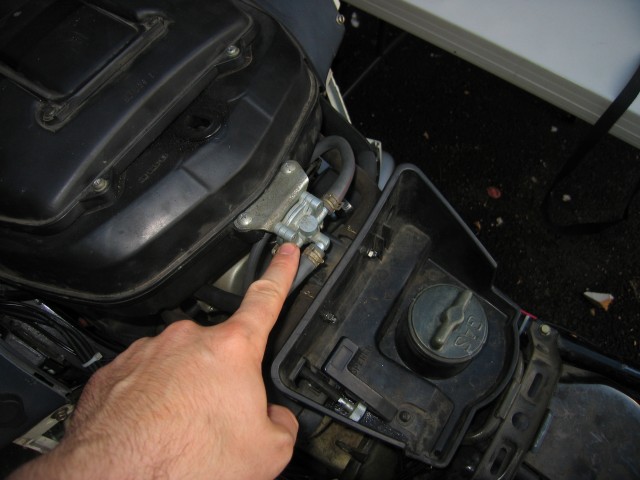

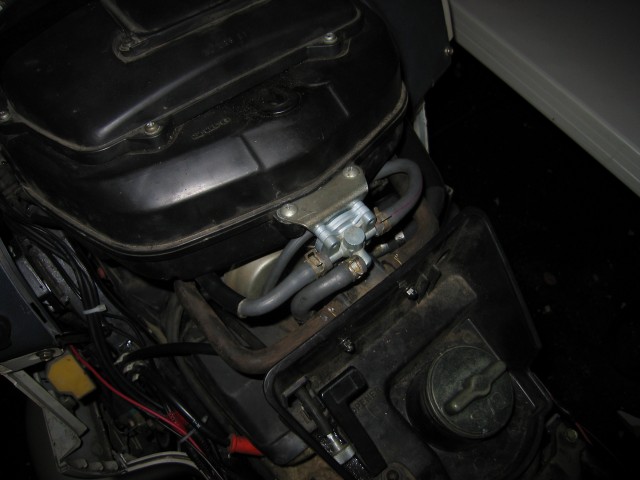
Hey Doug, I’m going to “borrow” the 2nd image down of you pointing to the petcock. And by borrow, I mean I’m going to steal it & put it in my video of the brass T fix.
I tore everything down, videotaped it all, but didn’t get a good establishing shot.
Thanks in advance. Don’t sue me.
-Scott
Hershey, PA
Hey Scott,
Feel free to borrow away! I need to go back and update this post… There seems to be a minor technical difficulty with the petcock not allowing fuel through now! I might end up switching to a brass tee 🙂
Thanks!
Douglas
I own a 89 PC800. had the Petcok Valve replaced about two years ago. Part from dealer cost me $142. alone. Plus labor. I am looking for a rebuild kit. Just the bubber parts and if needed the springs. I would hate have to get the whole thing again. The bike stinks. Otherwise it still runs just fine after it.
Please if you have any info let me know? trying not to spend another $200.00
Hi John,
The Honda part number is 16953-ME5 025 for the rebuild kit. This is not actually supposed to be for our bikes but everything fits *except* for the spring. Reuse the spring that’s currently in your petcock and you should be fine. With shipping, it cost me less than $50 for the rebuild kit. Also there is a K&L equivalent rebuild kit that is a little cheaper. You should be able to do all the work yourself. I did it in about an hour on my bike.
Cheers!
Douglas
Which K&L rebuild Kit are you talking about. I could not find one for the 89 PC800 Honda at their listing of Pet Cocks.
I did a quick Google search and came up with P/N 0705-0076. Try searching for “K&L petcock pc800.” When I tried ordering it before via ebay, the sellers always came back saying that they couldn’t find any stock of it though… I have heard since then that some people have been successful in buying that particular kit.
Hope that helps!
Thanks for the helpful comments and photos. After installing new camshaft plugs on my ’95 PC I am trying to reconnect the hoses to the petcock and find that I don’t know what to do with the petcock port that points straight down. Where does that thing connect to?
Hi Chris,
The small port on the bottom of the petcock is supposed to be left open to the atmosphere. I was told by folks on the IPCRC that it makes sure the vacuum system stays balanced. Also the petcock is supposed to operate with that open. Basically it sucks air through into the engine from that little hole. I still am not quite sure why the design leaves it open, but it does!
Cheers,
Douglas
Where do I begin, first off that tinny hole you see has nothing to do with the operation of the petcock valve. That hole is used in the manufacturing of this “spring set”. It is made, most likely, of stainless steel and is formed on a press and the hole is used to give a release to any vacuum that might form so the part can be extracted from the die (mold) it was made in.
Thanks for your quick response. The curious thing was that after reassembly, until I covered that port with my finger, I wasn’t getting any fuel into the carbs whatsoever so the bike wouldn’t start. I suppose that covering the port enable the system to prime itself and once primed I can just leave it alone. It’s all a little weird and I’ve never encountered anything like it. Thanks again.
Hi Chris,
I had that exact same thing happen when I rebuilt my petcock. It wouldn’t run right until I covered it. Afterward it was fine. I left it covered for a few rides and didn’t seem to have any problems. However, after I uncovered it, the darn thing got fuel starved. I got fed up with it and rather than diagnosing the problem, I just removed the petcock and replaced it with a brass T. So far so good with the brass T. Mother Honda probably is mad at me but I haven’t had any bad results yet. Of course I haven’t tipped over my bike yet either…
There is a good video on how to switch the petcock for a brass T if you are so inclined. It is http://www.youtube.com/watch?v=irDYIr1lLuU
Cheers,
Douglas
Hi Doug, I’m having a very similar problem with my PC did replace the guts of my petcock a while back and I think it may be at fault. I rode this thing across the country and back and it did as you described both ways on every hill or grade. Anyway did this ever solve your problems?
Thanks in advance
Everette
Hi Everette,
Yes, I solved the problem by removing the petcock and replacing it with a brass tee. On the IPCRC mailing list there have been many discussions about the merits of sticking with the petcock or replacing it with a brass tee like I did. People seem to be evenly split on which is the best method. I can say that all of my problems went away when I put the brass tee in and I haven’t had any new problems related to the tee crop up. Putting a tee in does change Mother Honda’s design though. It’s up to you in the end if you think it is safe with a tee versus a petcock or not. If you do put in a tee, be sure to cap off the vacuum line.
Cheers,
Douglas
You’re a life saver, Mr. VB. I took the petcock apart today and could not remember how to put it back together. I took it apart with a camera on my phone and two more on my bench and didn’t think to take any pictures. Thanks for posting these pics.
I also noticed the defect in the part you mentioned above.
I’m glad to hear that you were able to get it back together with my photos! Hopefully you will have more success than me with the petcock continuing to function. Mine failed again so I replaced it with a brass tee. It’s been that way for several years now.
Hello Douglas, thanks for such an informative website. I stumbled onto it as i noticed fuel spraying out the lower vent hole this morning at the bottom of the petcock. As a quick fix plugged up the vent hole and havent noticed any issue on my ride to work which is about 40 miles and the bike performed very well, infact better than average. In your experience with these petcocks and i am only looking for your thoughts here, can i simply leave the vent hole plugged up or should i look into replacing the petcock. what can happen by just leaving the vent plugged?
Hi Simon,
Are you talking about the petcock (silver, round-ish, three hoses coming off of it) or the carb vent tube (hard black plastic with one open port and about four or five hoses and the metal carbs attached to it)?
If it’s the petcock, I would be concerned that you are now allowing gasoline to bypass the carbs and go straight into one cylinder via the vacuum line. That will make that cylinder run much richer and could cause premature engine failure if you let it go on too long.
If it’s the carb vent tube (also called the “christmas tree” sometimes), you could cause fuel to go into parts of the carb that aren’t supposed to see fuel which could prematurely cause failure in the carbs.
If it is your petcock, I would suggest that you replace it with a brass tee. It’s cheap, easy, and will never fail again. The only downsides are 1) that if you tip your bike over, gas can slowly come out of the tank because you took the shutoff away and 2) if the bike sits for a long time (weeks), the gas in the line will settle back into the tank and you will have to crank a little longer for the pump to bring fuel up into the float bowls.
Cheers!
Douglas
Thanks so much for the quick helpful reply, yes its the petcock and i suspect your right that the one cylinder is running a bit rich. If the only drawbacks are the ones mentioned i will deff be doing the switch. Just a last question if i may, in an update you mentioned that it ran through 3000 rpm a little differently and that you may need to have the carbs ballanced, did you need to do this after the change?
Hi Simon,
Nope, I never rebalanced the carbs. I think what was actually happening was that I was getting some fuel starvation issues from the vacuum operated petcock. I ran a bunch of SeaFoam and Techron through a few tanks of gas after that and then was fine for many more thousands of miles.
In the last year though I got a tank of E-85 gas (mostly ethanol) which destroyed my whole fuel system. I’m still rebuilding the bike after that. 🙁 BUT! Now it will have fuel injection which is pretty exciting.
Cheers!
Douglas
Thanks Douglas. All the best turning her into a fuelie will be interesting to see the end result. Thanks for all the info going to put the T in this evening
Did the T solve your problems, Simon?
The fuel injection is up and running but my ECU is in the shop for service. Once it comes back, I will take the bike to a dyno to tune it and then I should be on the road!
Hi Douglas, worked like a charm. No more gas leaks or smell and seems to have the added benefit in that she feels a lot more gutsy throughout the rev range which is an added bonus. I can only think that the old leaking petcock was not letting enough fuel through.
Love my PC and have made a few changes like adjustable wind screen extension, driver back rest, travel trunk, third brake light and led lights for inside the regular trunk/saddle bags with auto on off capabilities but is not tied into the bikes battery. I’m kind of a re-purpose kind of guy and can’t see spending hundreds of dollars to get what I want for my bike. I’ve made all the parts or picked up parts from a junk yard, like the back rest is actually a head rest out of a junked car and so is the third brake light. I fabricated what ever I needed to mount these add ons. It’s been interesting especially the rack to mount the travel trunk and forming the Plexiglas to match the curve on the top of the windscreen. There are a few more things I’m working on like adding led fog and driving lights and a mount for my camera.
I also have a leaking petcock and after reading your posts I’ve decided to go with the brass tee but I’m going to add a fuel line shut off valve that I can access through the gas cap compartment that way if the bike goes down or when I shut the bike off it will only take me a minute to open the little cover, shut off the gas and lock it up. I always used to shut off the gas on my other bikes because they had the shut off valve just under the gas tank but the PC’s don’t now mine will.
There are a few other things I want to take care of like new front struts before I start to ride, hopefully in March, so right now she’s setting in my garage almost completely undressed. The worst part about working on the bike is taking off all the plastic which I have broken a few time and so has the previous owner but hey a little glue goes a long way.
Go for a ride!!
John of Woodalnd
Hi John!
There are some products that weld to ABS plastic to fix broken plastic tabs and cracks in the fairing. It’s on my “to-do” list after I finish my fuel injection project this spring. In the future I think that I am going to take your approach and try to repurpose as much stuff as possible. My big problem is that I know I can make some super fancy, expensive way work that will be really cool rather than taking the simple, straight-forward approach. 🙂
-Douglas
After taking my petcock valve apart and examining it very closely I noticed a few things about how it works and possibly why it malfunctions.
The weep port or drain port is actually between the fuel shut off diaphragm/plunger and the diaphragm on the vacuum side. In order for fuel to get to the weep port there are two things that could have happened;#1.there is a hole or tear in the diaphragm material #2. there is a leak at the very center where both diaphragms are held together. If the out side edges of the diaphragm have lost their seal then the fuel will run down the outside and drip off the weep port causing one to believe the problem is #1 or #2. In my case I did not check close enough as to where the fuel was actually leaking from so my experimental repair is not going to be a for sure thing. I’m not talking about my eventual replacement with the brass tee and the inclusion of a fuel shut off valve, I just like to experiment. If the fuel leak is caused by a outer edge of the diaphragm having lost its seal then it might be repaired by placing a 22 m/m O.D. X 20 m/m I.D. O ring. This only needs to be done on the fuel side to help seal the diaphragm. If you wanted to put an O ring on the vacuum side you would need a 35 m/m O.D. X 33 m/m I.D. O ring.
As for mending the plastic I’ve found a super glue that uses a brush to apply the glue and it works pretty good. A girl at Wal Mart told me about it and it’s called “nailene ultra quick pink brush on nail glue” that’s right it’s in the finger nail polish section in the store but hey it works good for me and I only slightly glued my fingers together just once. The brush makes it real easy to get an even coat without it running all over the place. Try it!!! I keep two on my work bench all the time.
Oh by my calculations the spring uncompressed is about 1.294″ i length and when assembled it is compressed to about .400″. I compressed to down to .375″ and read its pressure as being 9 ounces so the vacuum to open the valve must be greater or it will not open.
Hi,
What size brass tee is needed for the PC800 please?
For example on one ebay item I found ), the sizes available are:
”
SIZE AVAILABLE IN MM
6mm , 7mm , 8mm , 10mm , 11mm , 12-13mm , 19mm
SIZE AVAILABLE IN INCH
1/4″
5/16″
3/8″
7/16″
1/2″
3/4″
”
Thanks and regards, Nick.
Hi Nick,
I’m not sure of the size anymore. Most people buy a multi-pack of brass tees and find the one that fits the best. In this video there is a part number for the pack: https://www.youtube.com/watch?v=irDYIr1lLuU
Cheers!
Douglas
That was easy, thanks Douglas.
(5/16″, I believe)
Cheers, Nick.